Add prompts/options using List PLUs
Lists are used when you want to have a product display a list of options that you can select from. In the following example we will be making a Fish & Chips meal that will give options for Peas or Mushy Peas.
Firstly, we will need to make the options as PLUs. Do this in the same way as you would a regular PLU, following this guide. Also, make a note of the PLU numbers as you make them as this will make things easier in the following steps.
In this example we will not be charging extra for either option, so we need to enable ‘Zero Price’, under ‘Status Flags’. When the Fish & Chips prints in the Kitchen we want the Peas or Mushy Peas to print directly below the meal so the Chef knows what it relates to, so we’ll need to tick ‘PLU is Condiment PLU’ as well:
Once the various options have been made, go to Programming on the left and select List PLUs.
Find the next available unused List, and click on the number in red to the left to open the details:
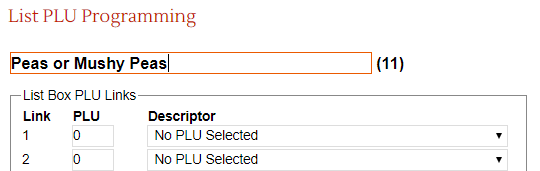
Once you have all the items in the list, click Save at the top of the screen.
We then need to attach the list to the item we need it to appear on, so click back to Products, find the meal in question, and click on its number box to open the details.
Related Articles
Assigning products (PLUs) to the till screen (Keyboard)
Now that you have made a new product you will need to put it onto the Till Screen to be able to sell it. Instructions Click Programming Select “Keyboard Allocation” from the dropdown list Click on “Open the Keyboard Editor” on the next screen. This ...Adding & Changing TAX to 12.5
The new rate of VAT for the tourist and hospitality industry will be 12.5% from 1 October 2021 to 31 March 2022. The temporary 5% rate ended on 30 September 2021, . Source: GOV.UK Please Note You may not have permissions to add or edit TAX rates on ...Creating a new product (PLU)
Instructions Login to the Microtill Cloud Click on "Products" from the left hand menu Click on the "New" button Enter the Name of the Product On the “Details” tab. Select a relevant Group, Department and Tax Rate as shown in the image below: Scroll ...